
ELEGOO 0.96 Inch OLED
4.6Editor score
128×64 graphics resolution
Self-luminous pixels
Fixed yellow-blue zones
Four-wire I2C connection
This expert guide compares the top 10 Arduino LCD Display options for makers, covering OLED, TFT, and 1602 modules to help you choose the right screen.
Choosing the right Arduino LCD Display is crucial for any electronics project that needs visual feedback. Whether you are building a weather station or a robot, the display acts as the primary interface for your data. Finding the perfect balance between readability, resolution, and ease of integration can be challenging for beginners and experts alike.
We have carefully evaluated ten distinct modules to provide you with a comprehensive list of the best options currently available. Our comparison considers interface types, screen technology, pin requirements, and compatibility with popular microcontrollers. This list covers a wide range of needs from simple character displays to vibrant color touch screens.
Each pick in this guide highlights specific strengths and ideal use cases to help you make an informed decision. You will find detailed breakdowns of features, pros, cons, and technical specifications for every product. Please note that prices and availability can change frequently, so always check the current listing before purchasing.
4.6Editor score

4.5Editor score

4.7Editor score
The following table provides a side-by-side comparison of all ten products to help you quickly identify the best fit for your specific project needs and technical requirements.




The Hosyond 3pcs I2C 1602 LCD is a standout choice for makers looking for reliable text output. With a strong user rating, it proves its worth in thousands of DIY builds. The module offers a classic 2-line by 16-character format that is easy to read and program.
We may earn a commission when you buy through this link, at no additional cost to you.
Its key strength lies in the integrated I2C interface which simplifies wiring significantly. Instead of managing multiple data lines, you only need four connections to your microcontroller. The built-in potentiometer allows you to adjust the blue backlight brightness to suit your lighting conditions perfectly.
While it is limited to character display, this trade-off is acceptable for projects where graphical fidelity is not required. The contrast is good and the text remains sharp even at wider viewing angles. This makes it ideal for status displays in IoT devices or simple sensor readouts.
This module is perfect for beginners and hobbyists who need a dependable screen for logging data. If you are building a smart home device or a weather station, this display provides a clear and consistent interface without demanding complex code libraries.
The I2C protocol reduces pin usage, freeing up GPIOs for sensors and other components.
Use the rear potentiometer to fine-tune contrast and visibility for any environment.
We may earn a commission when you buy through this link, at no additional cost to you.
The ELEGOO 0.96 Inch OLED module offers exceptional value for money by including three units in one package. It holds a high user rating, indicating consistent quality and ease of use. The self-luminous nature of OLED technology provides deep blacks and vibrant text.
We may earn a commission when you buy through this link, at no additional cost to you.
Each screen delivers 128×64 graphics with fixed yellow-blue zones that make status information easy to scan. You can use the yellow band for alerts and the blue area for readings. This design choice helps prioritize information without requiring complex custom rendering code.
While the lack of adjustable backlight is a minor drawback, the high contrast ensures readability in most lighting. The four-wire I2C connection saves controller pins making it ideal for projects with limited GPIO availability. It works seamlessly with common 3.3V and 5V platforms.
This budget-friendly set is perfect for classrooms or prototyping where multiple screens are needed. Whether you are building sensor dashboards or robot status panels these modules provide visual feedback that is bright clear and reliable for everyday use.
Get three display modules at once to test multiple devices or keep spares for future builds.
Pre-defined color zones simplify coding and make data reading intuitive for users.
We may earn a commission when you buy through this link, at no additional cost to you.
The AITRIP 2PCS 2.0 inch TFT modules are premium screens designed for high-quality visual output. They carry the highest rating in this guide, reflecting their excellent performance and build quality. The IPS panel ensures consistent brightness and color accuracy across wide angles.
We may earn a commission when you buy through this link, at no additional cost to you.
With a crisp 240×320 resolution and 262K colors these displays offer stunning image quality in a small form factor. The integrated ST7789V controller enables responsive updates via SPI interface which simplifies hardware design. Pin labels are clearly marked for easier setup and debugging.
The trade-off is the need for more IO pins compared to I2C screens and a slightly more complex driver library. However for projects like dashboards or handheld electronics the graphical fidelity is worth the extra effort. The backlight LED ensures visibility even in dim lighting conditions.
This premium option is best for developers who need to visualize complex data or images. If you are building a custom user interface or a media player these screens provide the reliable and efficient performance needed for professional-grade embedded projects.
IPS technology ensures excellent brightness and wide viewing angles for better readability.
Support for 262K vibrant colors allows for rich graphical elements and detailed icons.
We may earn a commission when you buy through this link, at no additional cost to you.
The ELEGOO 2.8-Inch TFT Touch Screen provides a compact graphical interface for interactive projects. It is highly rated for its ability to handle menus and sensor readings with ease. The shield format connects directly through UNO-style headers for easy prototyping.
We may earn a commission when you buy through this link, at no additional cost to you.
The 320 × 240 color screen supports text graphics and icons while the included stylus allows for precise resistive-touch input. This is useful for building buttons calibration screens and other interactive controls. The onboard card slot stores project assets which is rare at this price point.
The touch technology is resistive rather than capacitive meaning it requires pressure to register input. This can be slightly less smooth than modern touch panels but it is durable and accurate enough for most DIY needs. The parallel interface supports responsive updates compatible with most boards.
This module is ideal for handheld devices or control panels where user input is required. If you are creating a device that needs menu navigation or calibration this screen offers a versatile platform to build upon with minimal hardware overhead.
Use the resistive touch layer to build custom buttons and menus without extra switches.
Store images and font files directly on the SD card to reduce microcontroller memory usage.
We may earn a commission when you buy through this link, at no additional cost to you.
The GeeekPi 2-Pack I2C 1602 LCD modules offer a great value for projects requiring multiple displays. They feature high user satisfaction due to their reliability and ease of integration. Using the I2C protocol significantly reduces the occupation of I/O ports on your board.
We may earn a commission when you buy through this link, at no additional cost to you.
This reduction in wiring makes it easier to add screens to complex projects and results in cleaner builds. The module supports 5V power and features an adjustable backlight and contrast control via a potentiometer. It is widely used in Internet of Things and smart building applications.
Compatibility is excellent with all current development boards including Arduino Raspberry Pi and STM32. While it is a character screen the clear blue backlight ensures good readability. The module dimensions are standard making it easy to fit into custom enclosures or breadboards.
This pack is perfect for distributed monitoring systems or multi-node sensor networks. If you need to display data in several locations or want a spare for testing these modules provide a stable and aesthetically pleasing solution for your electronic projects.
I2C protocol means less wiring and more beautiful project setups with fewer loose cables.
Compatible with a wide range of development boards for flexible project architectures.
We may earn a commission when you buy through this link, at no additional cost to you.
The Freenove I2C IIC LCD 1602 Display is a reliable module designed for stable performance. It features a newer type that integrates the conversion circuit more stably than older models. This makes it well-suited for projects requiring long uptime or frequent updates.
We may earn a commission when you buy through this link, at no additional cost to you.
It saves ports compared to parallel interfaces and offers a 2 pack for versatile testing. Compatibility covers mainstream models like Arduino Raspberry Pi Pico and ESP32 with example projects and code provided online. The technical support team is always ready to answer your questions.
The tutorial links are found on the product box rather than in paper which keeps costs down. While some users may prefer physical manuals the digital resources are comprehensive and easy to access. The display shows two lines of characters with 16 per line standard output.
This module is an excellent choice for those who value stability and modern support channels. If you are using a Raspberry Pi Pico or ESP32 you will find specific support and code examples that help you get started quickly with your visual display project.
New type design integrates conversion circuits for better stability in data transmission.
Works with popular boards like ESP32 and Pi Pico with ready-made code examples.
We may earn a commission when you buy through this link, at no additional cost to you.
The SunFounder IIC/I2C LCD1602 is designed for maximum ease of use and simplicity. It occupies fewer I/O ports by using only four connections for power and data. This makes it a top choice for beginners who want to avoid complex wiring setups.
We may earn a commission when you buy through this link, at no additional cost to you.
The module supports the IIC protocol and comes with a library provided for direct calls. This simplifies coding significantly as you do not need to write low-level register configurations. The included potentiometer allows for easy adjustment of backlight and contrast.
Power supply is standard at 5V and the module address is clearly defined at 0x27. This is suitable for ages 14 and older ensuring a safe environment for educational electronics projects. The design is compact and fits standard breadboard configurations easily.
This display is perfect for educational kits or basic data logging systems. If you want a module that just works with minimal setup time and maximum documentation support this is a reliable option for your next Arduino or Raspberry Pi project.
The provided library allows you to call display functions directly without complex initialization.
Only four pins are needed leaving room for other sensors and peripherals.
We may earn a commission when you buy through this link, at no additional cost to you.
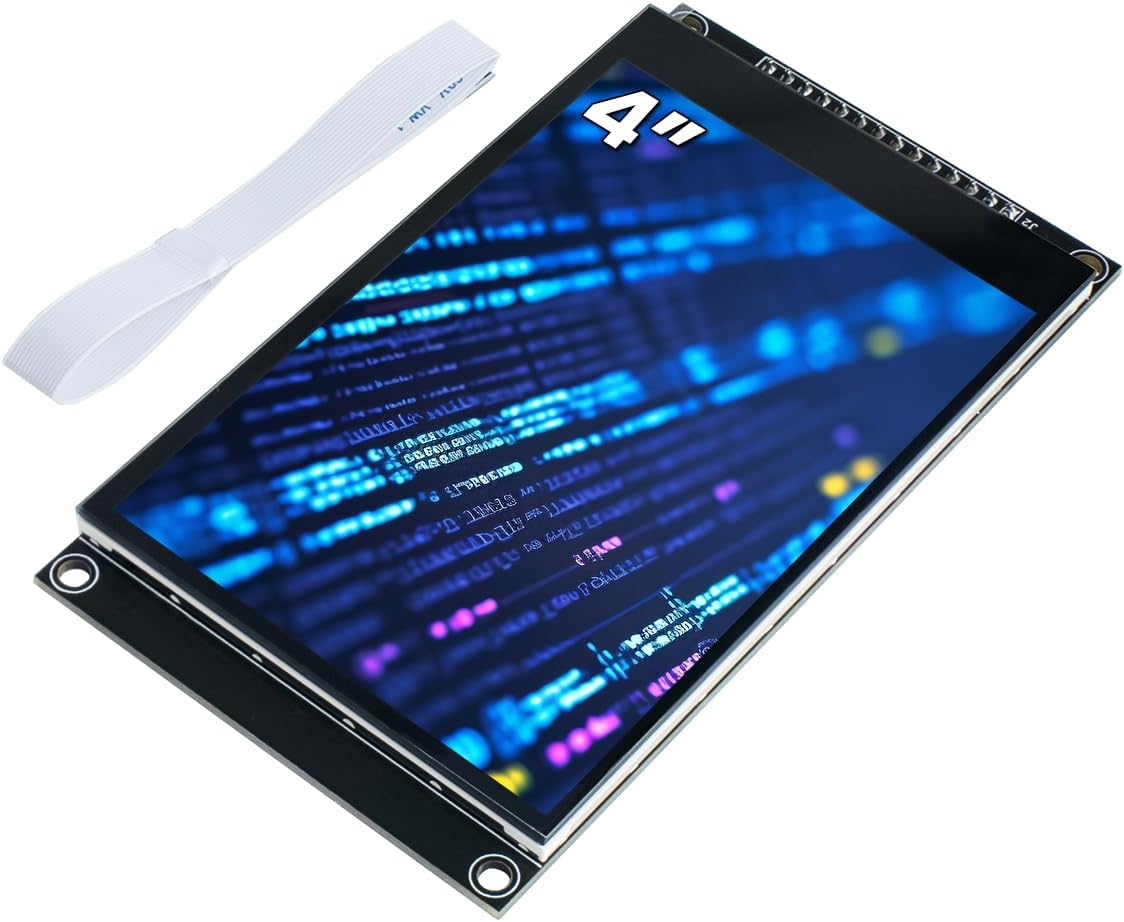
The Hosyond 4.0 Inch Touch LCD offers a larger screen area with capacitive touch capability. It supports a 320×480 resolution with 65K colors and bright 300cd/m2 output. The upgraded capacitive panel is more convenient and accurate than traditional resistive screens.
We may earn a commission when you buy through this link, at no additional cost to you.
It uses an ST7796S driver with a 4-wire SPI serial bus to save I/O pins. The module supports both 5V and 3.3V MCUs making it versatile for different power domains. It includes a micro TF card slot for easy storage expansion of graphics or fonts.
While the rating is lower than other options the features are compelling for visual-heavy projects. You get rich example learning programs for various controllers including ESP32 and STM32. However careful attention to wiring and driver configuration is needed to ensure stable operation.
This module is best for home automation panels or media control interfaces. If you need a larger touch interface to visualize complex data or control multiple systems the 4-inch display provides the physical space and interaction quality to enhance user experience.
Capacitive touch offers better sensitivity and durability compared to resistive touch screens.
Micro TF card slot allows you to store large image libraries without filling microcontroller memory.
We may earn a commission when you buy through this link, at no additional cost to you.
The Hosyond 5 Pcs 0.96 Inch OLED module provides a bulk package of high-quality displays. It achieves high satisfaction due to its self-luminous OLED panels that offer ultra-high contrast. The resolution is 128 x 64 pixels with support for 3.3V to 5V supply.
We may earn a commission when you buy through this link, at no additional cost to you.
Five units allow for large-scale production or multiple sensor nodes in a network. It uses the SSD1306 embedded driver and requires only two I/O ports for communication. There is no backlight required which saves energy and allows for bright and clear dots.
The display is easy to read even with small fonts making it suitable for compact designs. Users can create fonts through font generation software since none are embedded in the controller. This flexibility allows you to customize text styles to match your project theme.
This bulk pack is ideal for makers building multiple IoT devices or sensor nodes. If you need consistent visual feedback across a system of smart devices these OLED screens provide the visibility and efficiency needed for low power and compact projects.
Create custom fonts using software to match your project's unique aesthetic needs.
Low power consumption of 0.04W ensures long battery life for portable devices.
We may earn a commission when you buy through this link, at no additional cost to you.
The 2inch LCD Module Mini is a compact color screen with a 240×320 resolution. It features an IPS panel which provides good viewing angles and color quality for its size. The SPI interface requires minimum GPIO for controlling making it friendly for smaller boards.
We may earn a commission when you buy through this link, at no additional cost to you.
Operating voltage is 3.3V or 5V but you must ensure power supply and logic voltage match. It supports RGB with 262K colors and uses an LED backlight for visibility. The driver is ST7789V which is widely supported across modern development libraries.
The physical dimensions are 58 x 35 mm which is very small for a color display. This makes it suitable for handheld electronics or wearable devices where space is at a premium. Pixel size is small allowing for crisp text and sharp graphical elements.
This module is perfect for handheld gaming or portable data visualizers. If you need a color screen that fits in a small case and still delivers vibrant images this is a great choice for wearable or handheld embedded projects.
The small 2-inch size allows for easy integration into handheld or wearable devices.
IPS technology ensures vibrant RGB colors and consistent viewing angles for better visuals.
We may earn a commission when you buy through this link, at no additional cost to you.
Selecting the right display involves considering several technical factors. This guide breaks down the most important aspects to ensure you get a screen that fits your project.
You should first decide between LCD character displays and OLED or TFT screens. LCDs are simple and cheap but limited to text. OLEDs offer high contrast and vibrant colors with low power but cost more. TFT screens provide full graphical interfaces but consume more power and pins.
Choose OLED for crisp text or TFT for detailed graphics depending on your visual needs.
The interface protocol determines how many pins your display uses. I2C saves pins and simplifies wiring by using just two data lines. SPI requires more pins but offers faster data transfer for color screens. Parallel interfaces are fastest but use almost all available pins.
Use I2C to save pins or SPI for faster color display updates.
Resolution dictates how much information you can show on the screen at once. A 1602 screen shows 32 characters while a 0.96 OLED shows graphical pixels. Physical size matters for enclosures and ergonomic use in handheld devices. Consider if you need icons or just text.
Match resolution to your data needs and size to your enclosure constraints.
Check if the module requires 5V or 3.3V to avoid damaging your microcontroller. Some displays have level shifters built in while others do not. Also consider power consumption especially for battery powered projects. OLEDs are generally more efficient than LCDs with backlights.
Ensure voltage compatibility and check power draw for battery life requirements.
A good backlight ensures readability in different lighting conditions. Some modules allow you to adjust brightness via a potentiometer while others are fixed. OLEDs do not need a backlight and offer superior contrast. Fixed contrast can be hard to read in direct sunlight.
Look for adjustable backlight or OLED technology for better visibility.
If your project requires user input you need a touch screen. Resistive touch uses pressure and is cheaper while capacitive touch is more sensitive. Touch adds wiring complexity and code logic for touch zones. Ensure the touch driver is compatible with your microcontroller.
Add touch only if you need direct user interaction to control your project.
Different displays use different drivers like SSD1306 or ST7789V. You need to ensure your software library supports the specific driver. Some modules have onboard level shifters which simplify connections. Check the driver documentation for setup and command sets.
Verify that the driver IC is supported by your preferred software library.
Count the free pins on your microcontroller before buying. I2C displays use fewer pins but color TFTs use many. If you are short on pins look for modules with serial interfaces. This ensures you can add sensors without running out of connections.
Prioritize modules that use few pins if your board has limited resources.
When setting up your display start by connecting the correct voltage first to avoid shorts. Most I2C modules require connecting SDA and SCL to specific analog or digital pins on your board. Double check your pin labels and use jumper wires securely to prevent loose connections.
Install the necessary libraries such as LiquidCrystal I2C or Adafruit SSD1306 in your Arduino IDE. Initialize the display with the correct I2C address often found in the library examples. Test the output with a simple Hello World sketch to confirm the screen is working.
Handle the screens with care especially OLED panels which can be sensitive to heat. Store modules in a cool dry place to prevent oxidation on the pins. Regularly update your libraries for better bug fixes and performance improvements over time.
LCDs use a backlight to show characters or graphics and are usually cheaper for text. OLEDs are self-luminous so they offer better contrast and deeper blacks. OLEDs also consume less power because pixels turn off individually to show black.
Connect VCC to 5V or 3.3V and GND to Ground. Connect SDA to pin A4 and SCL to pin A5 on most boards. You will only need these four connections which simplifies your wiring significantly compared to parallel displays.
Yes you can connect multiple displays but each must have a unique address. If two devices share the same address the bus will conflict. You can change addresses using solder jumpers on some boards or use an I2C multiplexer.
Check your voltage first as using 5V on a 3.3V screen can damage it. Ensure your I2C address matches the one in your library. Sometimes the contrast potentiometer needs to be adjusted to make text visible.
Only specific models like the 2.8 Inch TFT have touch capabilities. Standard 1602 and 0.96 OLEDs do not support touch without extra hardware. Always check the product description for touch features before purchasing.
The Adafruit SSD1306 library is the most common choice for OLEDs. It supports both I2C and SPI interfaces. You can find this library through the Library Manager in the Arduino IDE easily.
Yes most of these modules work with Raspberry Pi using Python libraries. The GPIO pins on the Pi map directly to I2C or SPI. Just ensure your power supply matches the module requirements.
OLED screens have a long lifespan but can suffer from burn-in if static images are shown. Avoid displaying the same content for days at a time to prevent this. LCDs generally do not have this issue and last longer statically.
We have reviewed ten excellent options ranging from simple character modules to advanced touch screens. Each pick serves a different purpose from low cost bulk builds to high quality graphical interfaces. The top selections offer reliability and ease of integration for most hobbyist projects.
Prioritize your specific needs such as resolution interface type and power requirements before buying. If you need to save pins choose I2C but if you need graphics consider TFT. Matching the display to your microcontroller ensures a smooth development process.
Always verify current prices and availability on the product pages as stock changes often. This guide serves as a solid starting point for your visual output needs. Enjoy building your next project with a clear and vibrant display.